DIY Custom Jacket for Taylor Swift: The Eras Tour
If you’re at all familiar with Taylor Swift, then you know how absolutely mind-boggling the process for getting tickets to The Eras Tour was. Well, my sister managed to score some tickets to the one and only Taylor Swift: The Eras Tour!!!
DISCLOSURE: This post contains affiliate links, meaning I'll receive a commission if you purchase through my link, but at no extra cost to you. As an Amazon Associate, I earn from qualifying purchases. Please read the full disclaimer for more information. Thanks!
Whooo! Well, then I started doing some scrolling on Instagram … and I came across a reel video by@vhandstitching about making a custom jacket with Taylor Swift’s album titles. And I immediately decided to do the same. This post is about the process of making my own DIY custom jacket embroidered with Taylor Swift’s album titles for Taylor Swift: The Eras Tour.
Shop the Materials
Feel free to read the rest of the blog post for my journey on making this DIY custom jacket for Taylor Swift: The Eras Tour but, if you’re just looking for the materials, I’ve gathered them RIGHT HERE at the beginning so you can shop and get started making your own! Good luck!
White Jacket
the exact one I used
White Jacket
regular length
White Jacket
cropped length
Water Soluble Interfacing for Embroidery
the exact one I used
Water Soluble Interfacing for Embroidery
similar
Embroidery Needles
Embroidery Mini Scissors
Embroidery Hoop
8 inches
Embroidery Thread Colors
The full list of thread colors is further down the article.
The Inspiration: @vhandstitching
As I said, I came across reels from @vhandstitching on Instagram that showed how she was making a DIY custom jacket embroidered with all of Taylor Swift’s album titles.
As much as I loved her idea, I wanted a slightly different execution with the embroidered jacket and album titles.
After watching her videos, I decided I did not like the dark jean jacket. Mostly because I already had a jean jacket in my closet and I didn’t want to have doubles of an item but also because…
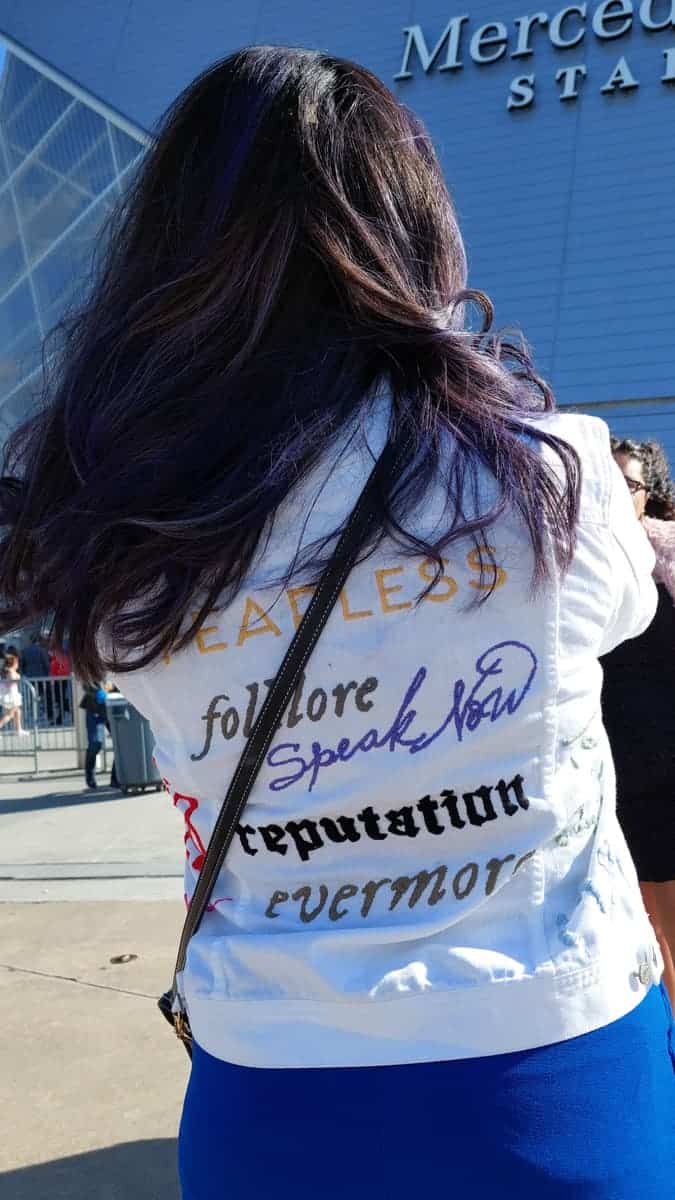
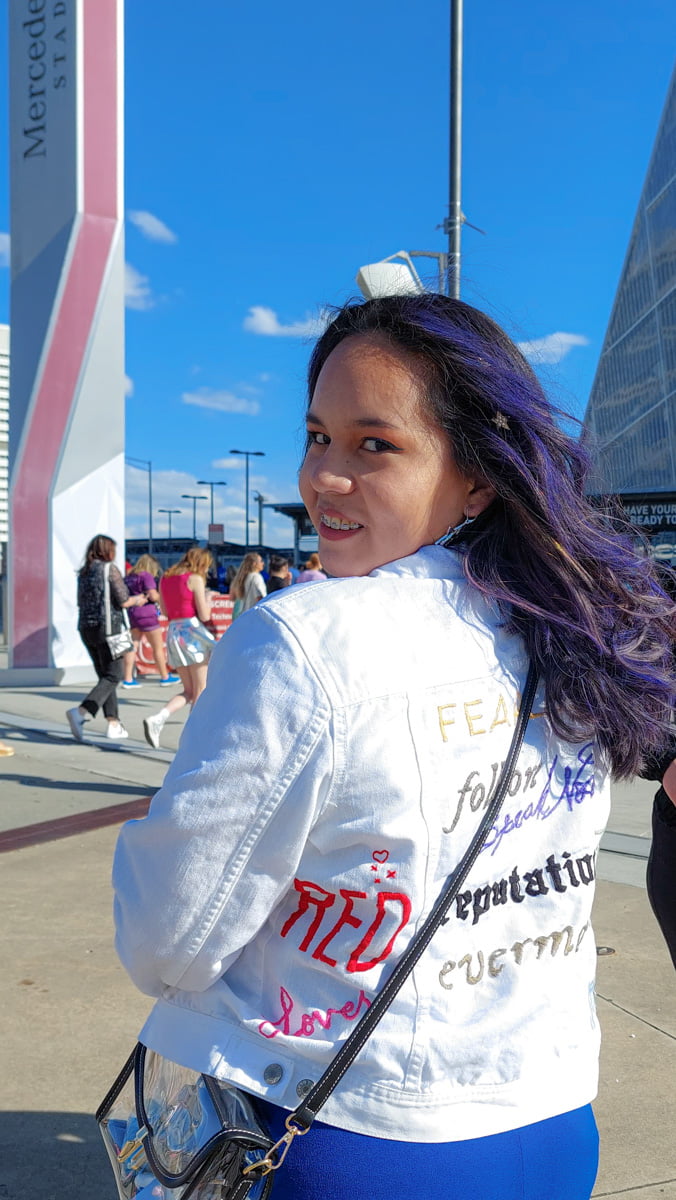
Since I wanted my full outfit to reflect the Midnights album – it’s my favorite lyrically and thematically – I decided on a white jacket so it would have the same effect as Taylor’s white coat in her Midnights outfit.
I also wanted the album titles to be done in their respective colors and to pop off against the background, so I thought a white jacket would be perfect.
Thrifting the White Jacket
I was randomly thrifting one day when I found a white jacket and cobalt blue pants at my local Goodwill. The perfect components for the Midnights album outfit! When I tell you I was internally SCREAMING, I am not joking.
The especially felt like a miracle find because it would allow me to do all the album titles in their respective colors and I knew they would look SOOO GOOD against a white background!
The only annoying thing is that the jacket was larger than my usual size but it gave me a larger canvas to work on!
My biggest worry was the colors for 1989, Folklore, and Evermore since they’re the lightest colors. Turns out, I didn’t need to worry at all. They looked great against the white background!
Testing the Jacket Layout & Design
Let me just put myself on blast and say:
I DEFINITELY STARTED THIS PROJECT A LITTLE TOO LATE.
I spent like TWO WHOLE WEEKS testing out the design, instead of sitting down and ACTUALLY EMBROIDERING.
Don’t be like me.
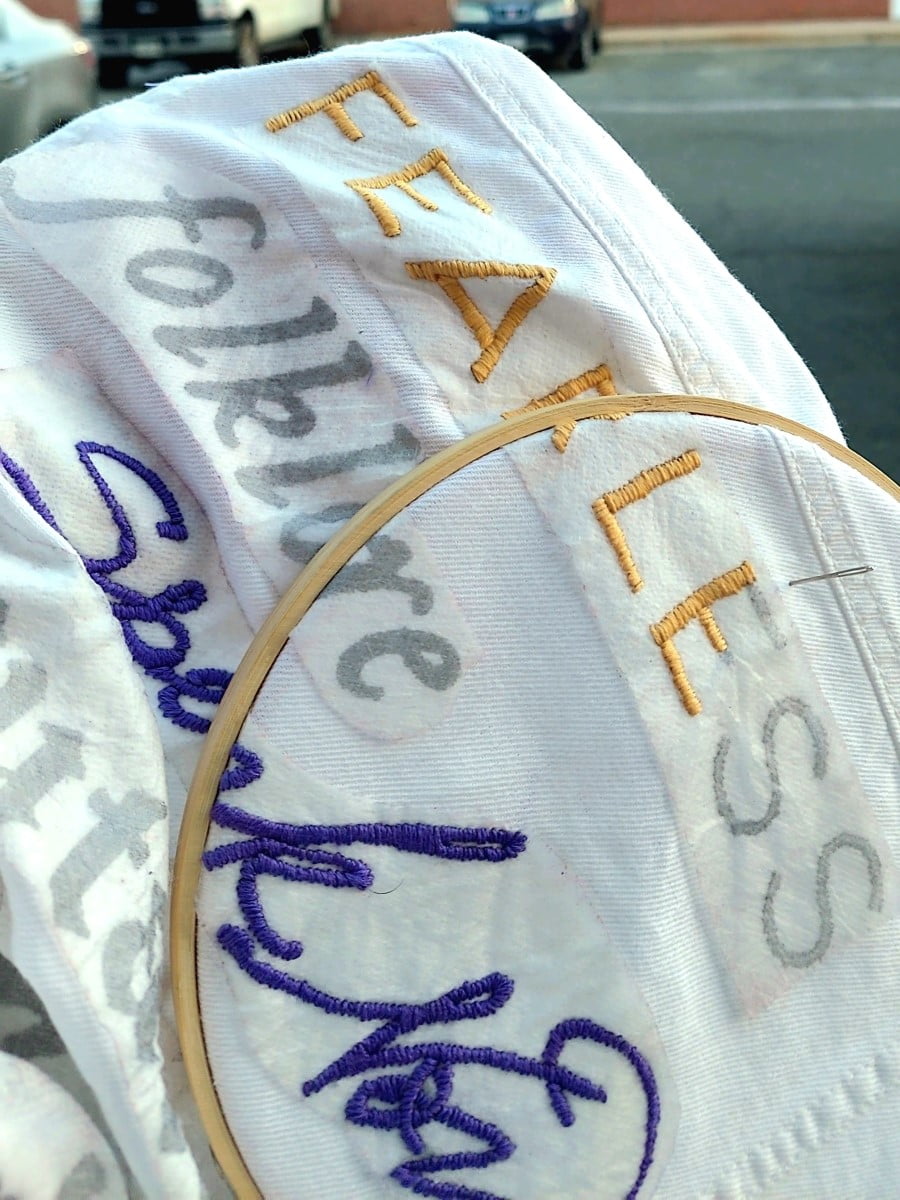
However, unlike the inspiration for this DIY custom jacket, I did not want to embroider over the THICK jacket seams.
I wanted all the Taylor Swift album titles to fit between the seams, and be as big as possible while still having plenty of spacing. This required a few rounds of testing.
I tested the design using regular printer paper and resizing as needed.
Once I had the right sizes and layout, I printed the designs on the water-soluble interface and laid them out on the jacket.
P.S. Want the album titles without all the searching? Click the button for the downloadable file.

example of a round of testing out the layout (not the final design)
PROJECT ADVICE
Once I had the right sizes for the album designs, I immediately printed the designs on the interfacing (totally okay), peeled off the cover for sticky backing (nope), and stuck them on the jacket (absolutely don’t do that).
What ended up happening is that the designs lost their stickiness over time and would FALL OFF THE JACKET. I almost lost an album title because of this bad decision!
Definitely print the album titles off all at once but don’t stick them on the jacket all at once. Stick the album titles one at a time and immediately embroider the design before adding the next album title.
Planning the Album Colors
My next step was to do a lot of visual research. While quite a few Taylor Swift albums have specific colors we can ALL agree on, other Taylor Swift albums (mostly the recent ones) have no defined COLOR yet.
That’s when I hopped over to Instagram and started analyzing the tour poster (and, occasionally, fan edits of the various albums) to see what color was associated with each album by the fans.
For me, the biggest color change was to the debut album. Growing up, I’d associated the debut album with the color teal but, on her poster, Taylor Swift gave the debut album the color green!
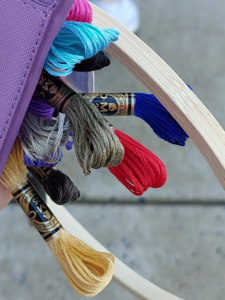
After lots of online scrolling and googling each Taylor Swift album, I headed over to Michaels to see what embroidery thread colors they had.
Getting the Embroidery Materials
I was absolutely shocked at the VARIETY of colors for embroidery threads!
I spent no less than one whole hour analyzing every color choice against The Eras Tour poster and my guiding color swatch (and I still ended up coming back a few times for new embroidery thread purchases).
I also grabbed an 8-inch embroidery hoop and a pack of embroidery needles. While I had needles at home that probably would have worked, I didn’t want to risk it.
I’m super thankful to the amazing people at Michael’s!
There was a fellow customer who looked like she had way more experience in embroidery than me (she had a full cart of yarn and a BUNCH of embroidery threads in her hands) and she was SO HAPPY to help me out in picking the right needles for my project.
Also, Kathleen was a store associate who gave me such amazing feedback and encouragement for the project. Sometimes, you just need a little bit of hype from someone else and she DELIVERED.

gathering materials for the DIY embroidered jacket
PROJECT ADVICE
If you’re making this DIY embroidered jacket project as well, I highly recommend using the interface (for the pattern) AND an embroidery hoop (to keep your jacket fabric stretched).
The embroidery hoop made a huge difference and kept my design from “puckering”, which is basically when your threads shrink together and it makes your design look warped.
This advice was backed up by a Michael’s associate and it was absolutely worth the extra money and effort. I definitely recommend taking the extra time.
The Embroidery Thread Colors
When I tell you THIS WAS THE MOST STRESSFUL PART, I am truly not joking. The sole reason why I kept putting off ACTUALLY embroidering.
To save you some headache, I’m sharing the DMC embroidery thread colors I used to create my DIY embroidered jacket for Taylor Swift: The Eras Tour:
Taylor Swift (debut): genuinely unsure, will update
Fearless: DMC 676
Speak Now: DMC 208 or 155
Red: DMC 349
1989: DMC 3752 but also considered DMC 775
Reputation: DMC 310, consider getting two
Lover: DMC 602
Folklore: DMC 645
Evermore: DMC 610
Midnights: DMC 820

PROJECT ADVICE
I was so worried about getting the embroidery thread colors wrong and messing up the DIY custom jacket project … but I didn’t!
After actually using the embroidery thread colors I chose for the project, I think getting the colors CLOSE ENOUGH provides enough of the “vibe” that it’s okay if your color choices are a little different!
Work in Progress Pictures
I highly recommend you give yourself a minimum of three weeks to work on just the embroidery for the DIY embroidered jacket. I only ended up having about two weeks to embroider and it was HECTIC, especially since I was still studying and completing assignments for school.
Give yourself as much time as possible to work on this project. It takes A LOT longer than a simple iron-on. You’re gonna need time to go back and forth, undo a few stitches, and maybe even rip a full album title if you don’t like the color (thank goodness I didn’t have to!).

PROJECT ADVICE
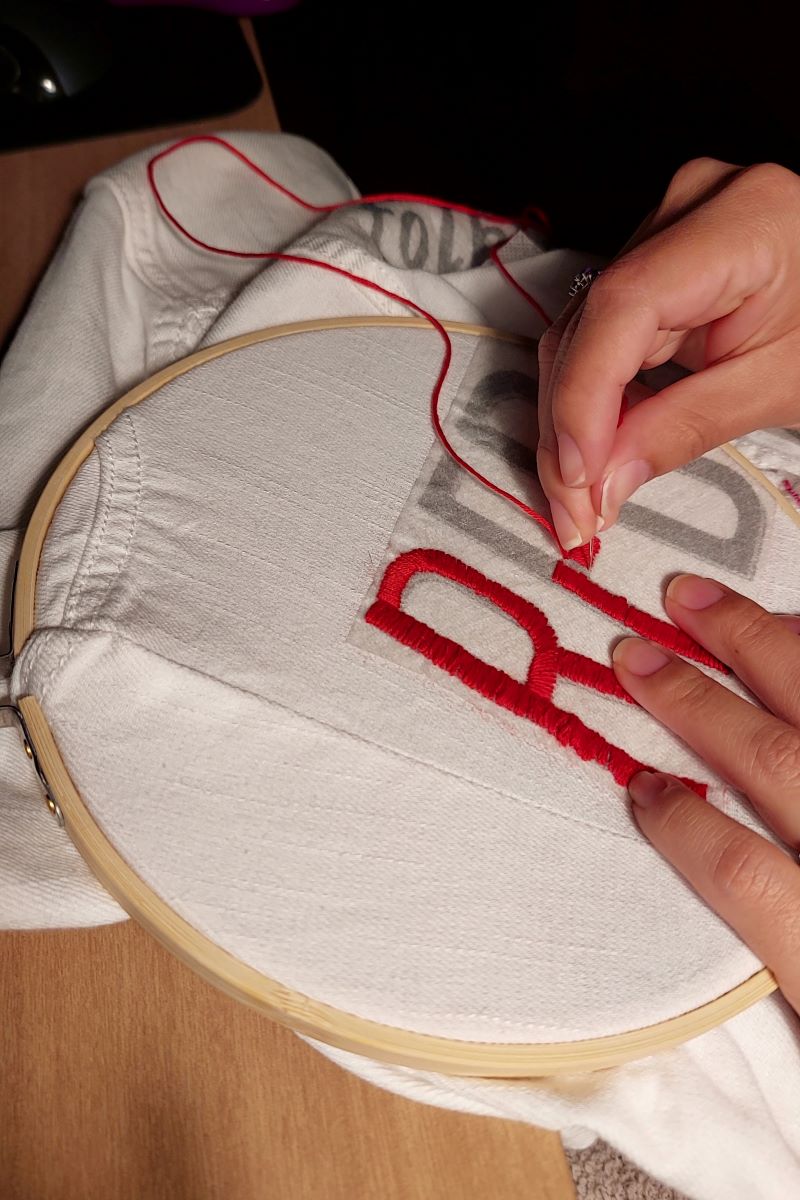
I found it easier to do straight stitches across the block fonts (like Red and Fearless) and do diagonal stitches on everything else.
On the cursive fonts (like Speak Now and Lover), take the time to really think through how you will stitch the different loops and letters to avoid having thick layers of stitching. Good luck!
Washing Your Jacket
While I don’t want to take away your caution about the embroidery thread colors running when you’re washing your jacket, I will say that mine went without a hitch (and it’s been through TWO washes now).
Once I was done, I took the DIY embroidered jacket into the shower and gently washed the water-soluble interfacing away. Once I saw that the embroidery threads colors weren’t running across my white jacket and ruining it, I took the jacket to the washing machine and let it get SOAKED.
The washing machine took away all of the interfacing and all the sticky bits. I then moved the jacket into the dryer and let it finish up. I did not let the custom embroidered jacket linger in the dryer and heat.
I was able to wear the DIY embroidered jacket immediately, which was great because I needed to head out to Taylor Swift: The Eras Tour concert anyway!
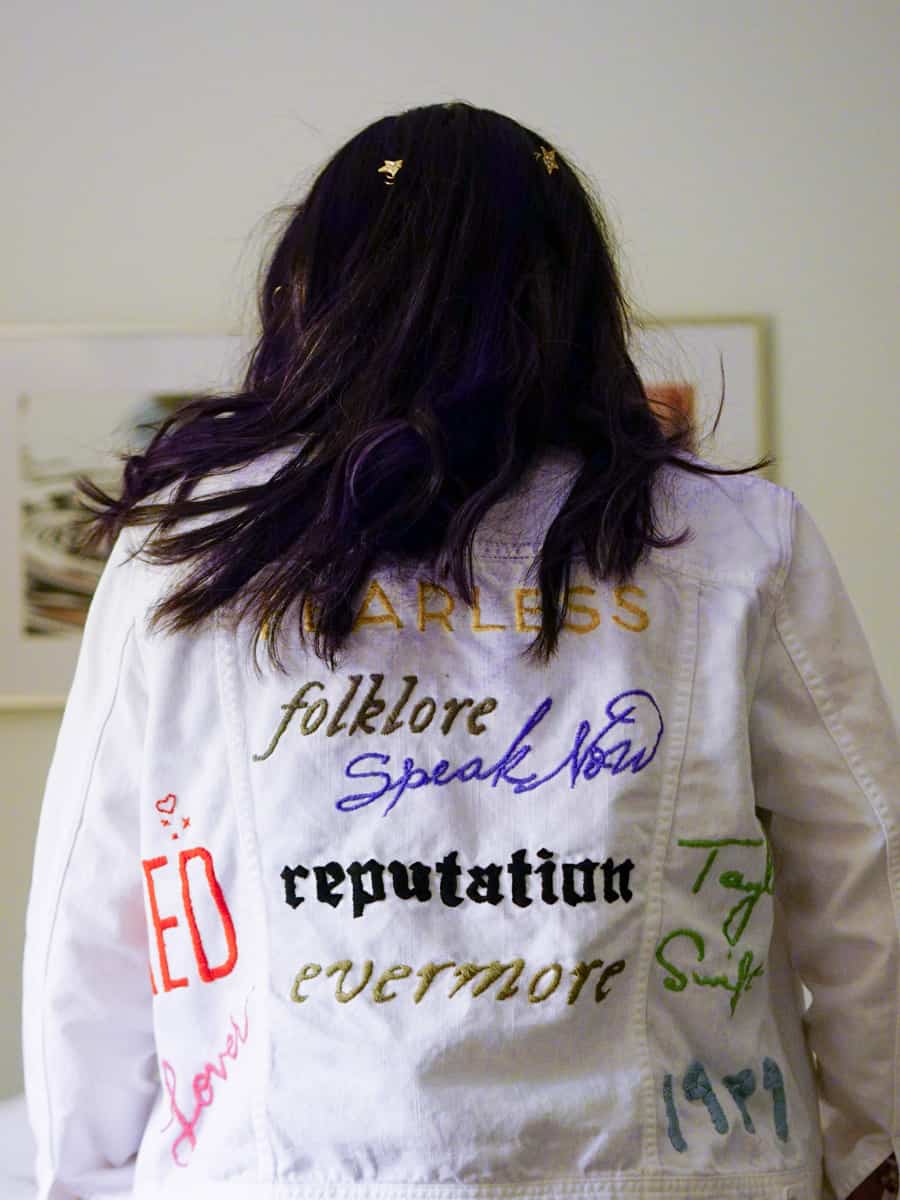
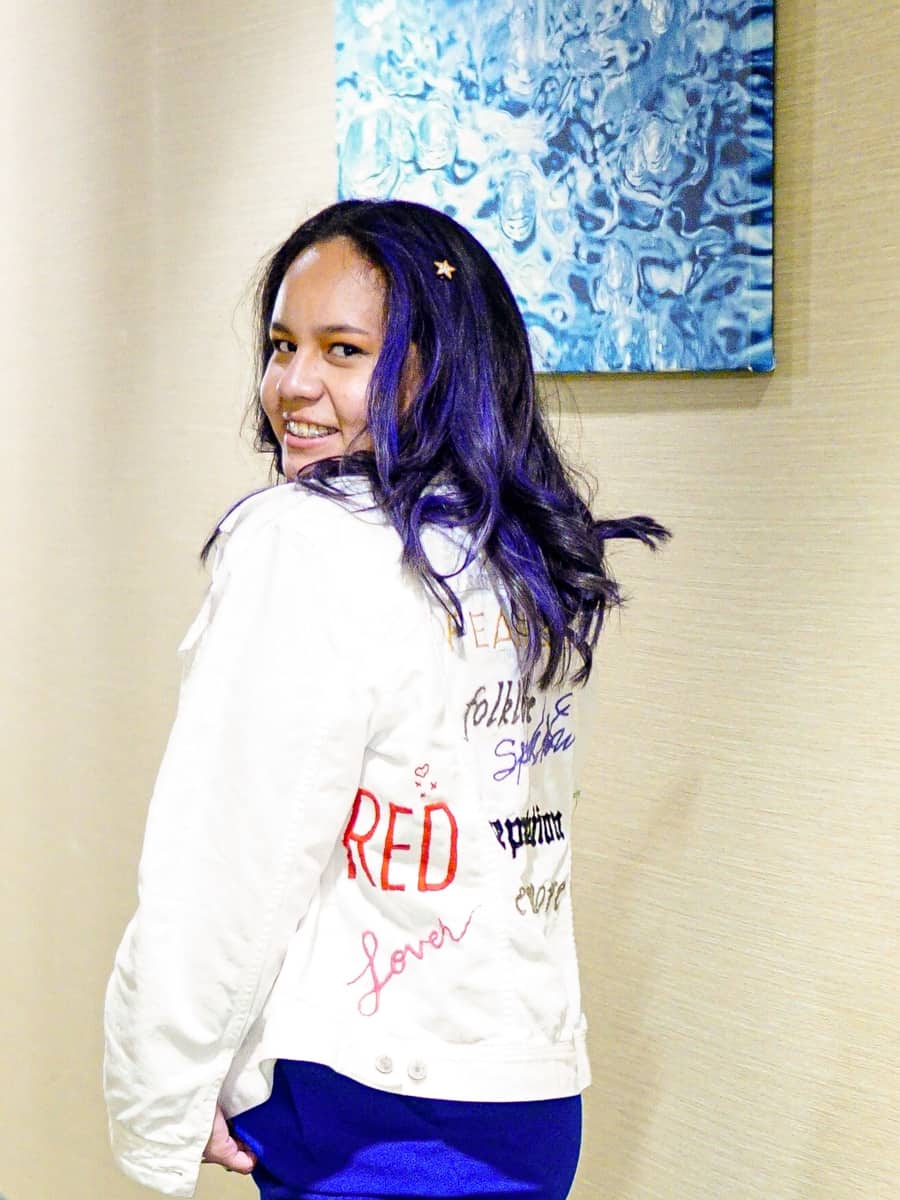
The Finished DIY Embroidered Jacket
Okay, so technically, if you look super closely, my DIY embroidered jacket is actually … ummm … not finished.
I didn’t get a chance to do Midnights but that’s my next embroidery project … plus something on the front of the jacket!


Phew, that was a long writing session but I wanted to include all of the tips and details in case it helps you with your DIY embroidered jacket project!
Please, please, please, if you decided to do a similar project, please comment below with a link to your socials and/or tag me in your social media posts! I have been loving seeing everyone’s outfits and custom projects.
I can’t wait to see how yours comes out!
This is a style & fashion post about
Creating a DIY Custom Jacket for Taylor Swift: The Eras Tour.
This product presentation was made with AAWP plugin.